"Hurry Up and Wait - France 1944"
The convention in Norfolk was GREAT this year! Lots of great dioramas and I got to see lots of folks that I have talked to online or bought/traded with in the past.
I was able to create and enter a diorama - the Hasbro M-8 Armored Car (or as the Brits called it, the "Greyhound".)
Basically I did this diorama to show everyone that bad mouthed the M8 it could be made into a very nice vehicle. I STRONGLY believe I accomplished that - but you decide for your self.
Below I have included pictures and a LOT of descriptive information of how I made the diorama base and the enhancements to the M8. I hope this gives you some cool ideas and helps you with your diorama building and vehicle modifications.
|
| This is the view of the diorama at the convention.
EXTERIOR OF CAR I added real chain to the front to simulate heavy-duty tow chains the crew would use as additional armor. Also on the front you will find a .50 cal ammo box added with the crew's repair tools inside it. I got the tools from the same inexpensive fireman sets I got the fire extinguisher from. The towrope is made from picture hanger wire attached to the original plastic tow hook ends. I snaked the towrope from the front all the way to the back. The ammo boxes in the mine racks are repainted, weathered Hasbro .30 cal ammo boxes from some of the earlier Classic Collection accessory cards. On the sides of the driver/passenger bulge, I added the view port that Hasbro for some reason left off. I made this from sheet plastic. The rivets on either side are made from the cutoff ends off tiny bullets glued onto the plastic. I then painted them olive drab and weathered them to make them blend in with the rest of the car. On the turret, I made a hatch cover with real rope and grommets, added the .50 cal machine gun from a Formative Jeep (cut down and weathered) and then replaced the Formative .50 cal with the smallest .50 cal I could find (to keep everything looking in scale). On the mantel, I replaced the Hasbro .30 cal barrel with the barrel from the 21st Century Toys .30 cal I cut up to put inside the turret. Around the turret are various tarps I created from olive drab fabric. The backpack is a Hasbro vintage backpack. On the back deck on top of the engine compartment vents, I put a Hasbro Jerry Can and a heavily weathered storage crate (from one of the Hasbro accessory cards.) The tie-down straps are cut up 21st Century Toys modern belts. I added weathering to the entire car exterior in the form of steel paint on edges and heavy wear areas, a black wash to tone everything down, rust in key locations, and various shades of mud and dirt. I also painted the entire underside black to simulate grime and then "dirtied" it up. THE DIORAMA BASE The base is a 4' x 2' Pine board. I used a router to edge the board. I sealed the wood with MinWax stain primer. I then stained it with MinWax Stain/Polyurethane (2 coats). The building is made from 1" styrofoam available in a package of several sheets from Home Depot. I used an Xacto knife to do all the cutting including the window openings, the blown up edges, and the bullet/shell holes. When you cut this Styrofoam with an Xacto knife, the appearance you get is that of torn up concrete (exactly what I wanted). The inside and outside are painted with Krylon Acrylic Latex Interior/Exterior gray primer (#KDH5018) from Wal-Mart. I felt it really made the foam look like concrete. The outside of the foam is sprayed with Plasti-Kote Fleck Stone Spray Stone Finish Gotham Grey (#11445). I felt this REALLY made the wall standout and definitely gave it more of a rock-like appearance than just the primer. The walls and all items glued to the board were glued with Weldbond Universal Space Age Adhesive available at Home Depot. It looks like, smells like, and cleans up like Elmer's - but it holds like iron! The wood flooring is made from 300+ cut up and stained Popsicle sticks (available in GIANT boxes at craft stores like Michael's or AC Moore.) The rubble is made from cut up strips of the same Styrofoam used to make the walls, glued to the board using the Weldbond glue. The pieces are cut so they would mate up ON BOTH SIDES of the wall at the ends of the walls and in the corners. This makes the rubble look more realistic. They were then painted with the gray primer to make it look like wrecked concrete. To complete the rubble, I used layers of glue and large pellet cat litter to make the rubble taller and uneven. I also glued cat liter on the front and right edges to give it more of a wrecked building look. After the glue holding the rubble dried, I picked up the board, took it outside, and patted the bottom of it while on its side. This removed most of the litter that had not glued to the Styrofoam and board. I then mixed Weldbond with the gray primer and painted this mixture over the cat litter. This got rid of the cat litter colors (bright green and odd tan!) and made the ruble more uniform in appearance. It also made the rubble strong as iron and glued all the litter down from the top. To finish the base, I used a wash and dry brushing of Oily Black acrylic paint made by Polly-O (available at hobby shops in the train section).
|
|
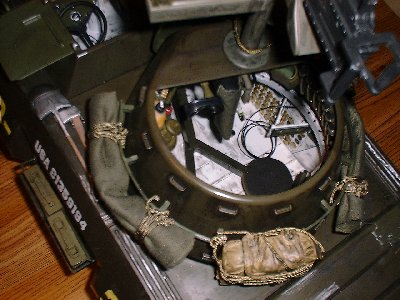
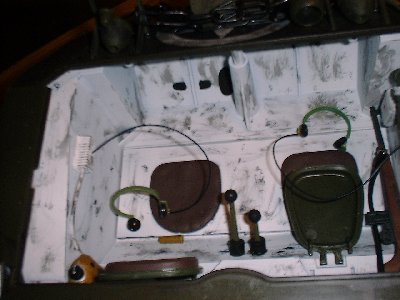
| INTERIOR OF CAR
INTERIOR - MAIN BODY The Hasbro M-8 armored car is basically a kit. Hasbro sold two variants of this vehicle: the fully assembled version w/ two figures (available at Toys R Us for about $70-$80) and the kit version you had to assemble (available at Sears Wishbook and several stores such as Wal-Mart, FAO Schwartz, and Boscovs) for $40-$60. The version I bought was the kit version. The first thing I did to the interior was to paint it white. Using pictures and the write-ups I found in my two main references (see the References Section in this write-up), I painted the floor, sides, and front angled floor white. I did NOT paint the hatches, turret inside, or the inside of the driver/passenger bulge on the front (the white would have been very visible from the air and the ground if those areas had been painted). I detailed the radio and dashboard (painting the dash dials black with white letters and indicators). I painted the steering wheel flat black. Make sure you use an acrylic paint for the steering wheel - it is made of soft plastic and will not take well to enamel (the enamel will never dry.) After painting the interior, I drilled out all the holes in the 37mm shell rack. The grenade shells that come with many of the Formative Soldiers of The World sets (such as the Vietnam M79 Grenadier figure) are just a tad too big for the holes in the 37mm shell rack. If you drill out the holes, you can fit the shells in. Now, I began to detail the inside. I took two opening .30 cal. ammo cans and glued them on the passenger's side, over the 37mm shell rack. I then placed .30 cal ammo inside of them. When displaying the vehicle (such as in the diorama), I leave them open to give the feeling of the soldiers working inside the vehicle. On the floor, I brushed on liberal amounts of steel to make it look like the paint had been worn off. I then dry brushed on black to simulate grime and leaking hydraulic fluid. There were basically two reasons the soldiers would field-paint the inside of the car. One was to add extra reflection, thus improving the light when the hatches were closed (there were no interior lights - the passenger/radioman would actually use a flashlight to illuminate the dashboard and stick shifts for the driver!) The second reason was to provide a high-contrast background to allow the crew to spot hydraulic fluid leaks (the M-8 was notorious for leaking A LOT!) In the driver's compartment, I built the two stick shift levers and glued them into place. I also built the gas, clutch, and brake pedals (in the shapes they had in the real vehicle) and glued them in place. The fire extinguisher is from a cheap fireman toy set I got at Kay Bee Toy Outlet. As it turns out, Hasbro put the indent in the floor where the extinguisher was supposed to go. All I had to do was put it in. I built the three internal communication systems (driver, passenger, and commander located by the 37 mm shell rack) from scratch. The junction boxes are first aid kits from the Timeless Collection Scramble Pilot. I sanded the cross off, drilled holes in them, and painted them white. The headsets are from Action Man 1960s/70s radios. The large communication wires running out of the communication sets in the front of the vehicle are made from plastic rope you can get at craft stores. The canteens by the driver, passenger, and in the turret are from the Hasbro WWII Medic set. I removed the prong in the back of the canteens and glued them down. The first aid kit in the passenger compartment is a Hasbro MOPP Emergency first aid kit (from the MOPP carded set). I built the bracket for the flashlight and glued it in. Behind the driver's seat is the crew's water supply. These water cans were famous for leaking - so the driver was often wet! To finish the 37mm gun ammo rack, I cut the fronts off of about 70 Formative grenade shells with my Dremmel (they were too long to fit in the rack), painted them brass, and glued them into the rack. Note the driver and passenger seats. In the Hasbro M-8, both seats fold down. In the real M-8, the driver seat is fixed and the passenger seat folds down so the passenger can get into the back of the vehicle.
|
|
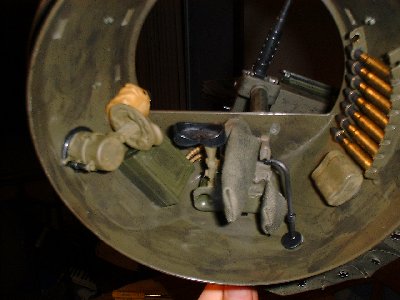
| INTERIOR OF CAR
INTERIOR - TURRET I painted the turret ring white and put the location hash-marks on it (the hash-marks were actually degree markers in the real M-8 - they provided a way for the gunner and commander to know what way the tank and the turret were pointing.) On the main gun, Hasbro put the breech in upside down. I drilled out the tab on the cannon on the opposite side and put the breech in correctly. On the left of the main gun, I built the sight from a Formative M-16 rifle sight and a Hasbro goggle (the real site looked VERY much like the one I made - it had a full-face sight with only the right eye being usable.) I used a 21st Century Toys .30 cal, cut it up, and put the back portion inside the turret. I then built a remote firing arm and attached it to the turret. In the real M8, the.30 cal ammo can was on the left side of the hull. The ammo snaked over the main gun to the .30 cal. I mounted a small ammo can on the left part of the turret and fed the ammo over to the .30 cal. The crew didn't want the hot spent 37mm and .30 cal shell casings flying around the inside of the tank so, they made and attached canvas bags to both weapons. I did the same, and filled them with spent Formative grenade and .30 cal casings. On the right side, I took a Dragon German mess kit bottom, painted it olive drab, and glued it onto the wall to represent the binocular case attached to the inside of the turret. The M-8 used a manual turret rotation mechanism consisting of two wheels - a large wheel with a small one attached to it. The large one moved the turret quickly while the small one allowed for fine rotational adjustments. I built these using one of the signal lamps from the Timeless Collection Spy Island sets. I cut its front off, and then took one of the round German land mines from the D-Day accessory set, cut its top off with my Dremmel, and glued it to the handle of the signal lamp. I then took a small wheel from one of the tiny scooter sets you can get at places like Target and glued it to the edge of the large wheel. I then glued the entire assembly (using the front of the lamp as the base) to the left side of the turret. For the seat support bracket, I built the fake floor the real M-8 had and attached it to the bottom of the seat bracket. I then built the remote firing pedals for the 37mm and .30 cal guns and attached them to the fake floor. I built seat cushions for the turret seats from black self-stick foam sheet. I finished off the detailing by painting all the shells in the turret shell racks brass with black tops. I then weathered the interior of the turret with a black wash and black dry brushing.
|
| REFERENCES
Squadron Signal Publications: U.S. Armored Cars In Action Armor Number 37 (ISBN 0-89747-391-4): EXCELLENT book for M-8/20 history. Great for detailing the outside of the vehicle.
|